


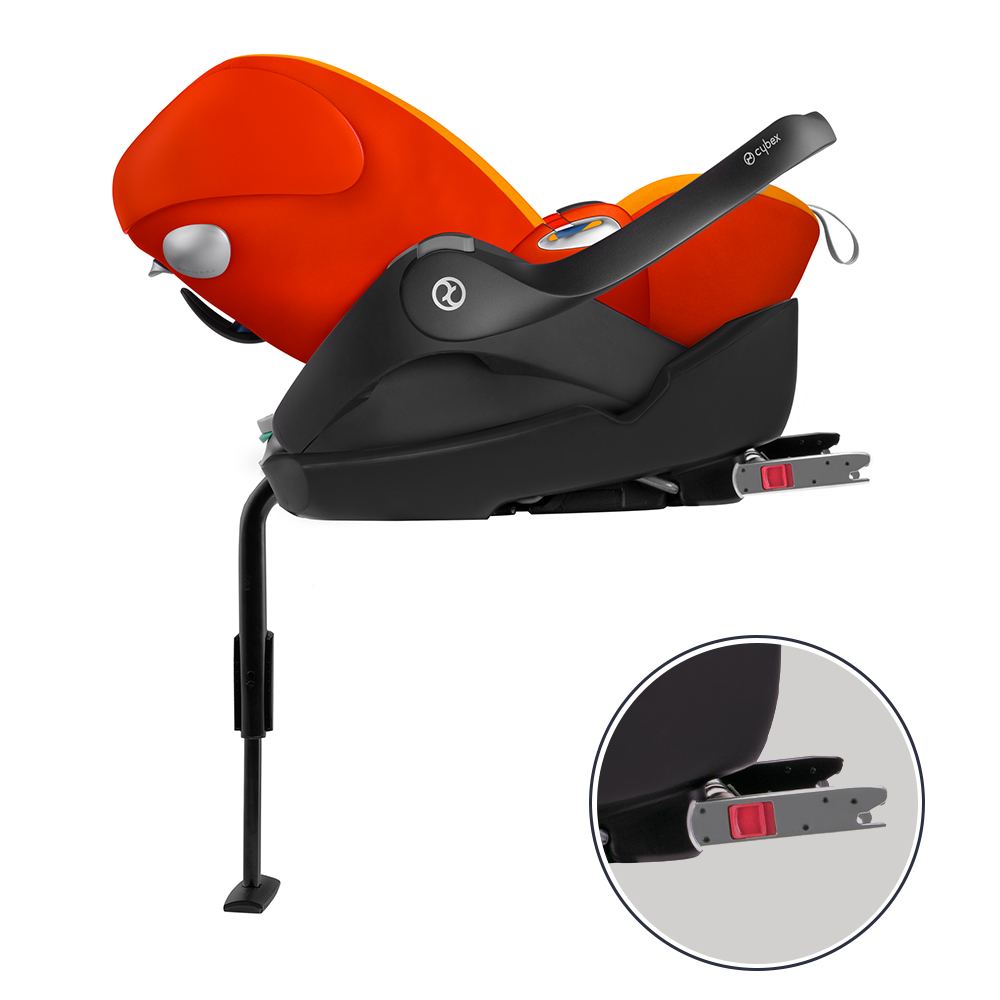
Base Installation
Many infant car seats include a separate base that stays installed in the car. The base can be installed using either the seat belt or LATCH and allows the carrier to be clicked in and out easily.

LATCH System
LATCH stands for Lower Anchors and Tethers for Children. Instead of using the seat belt, this method uses dedicated lower anchor connectors found in your vehicle to secure the car seat.

Top Tether
For forward-facing seats, the top tether is a strap that connects the top of the car seat to an anchor point in your vehicle, helping reduce forward movement in a crash. Some seats may offer tethering while rear-facing as well. Be sure to look in your manual for all tethering instructions.

Seat Belt Installation
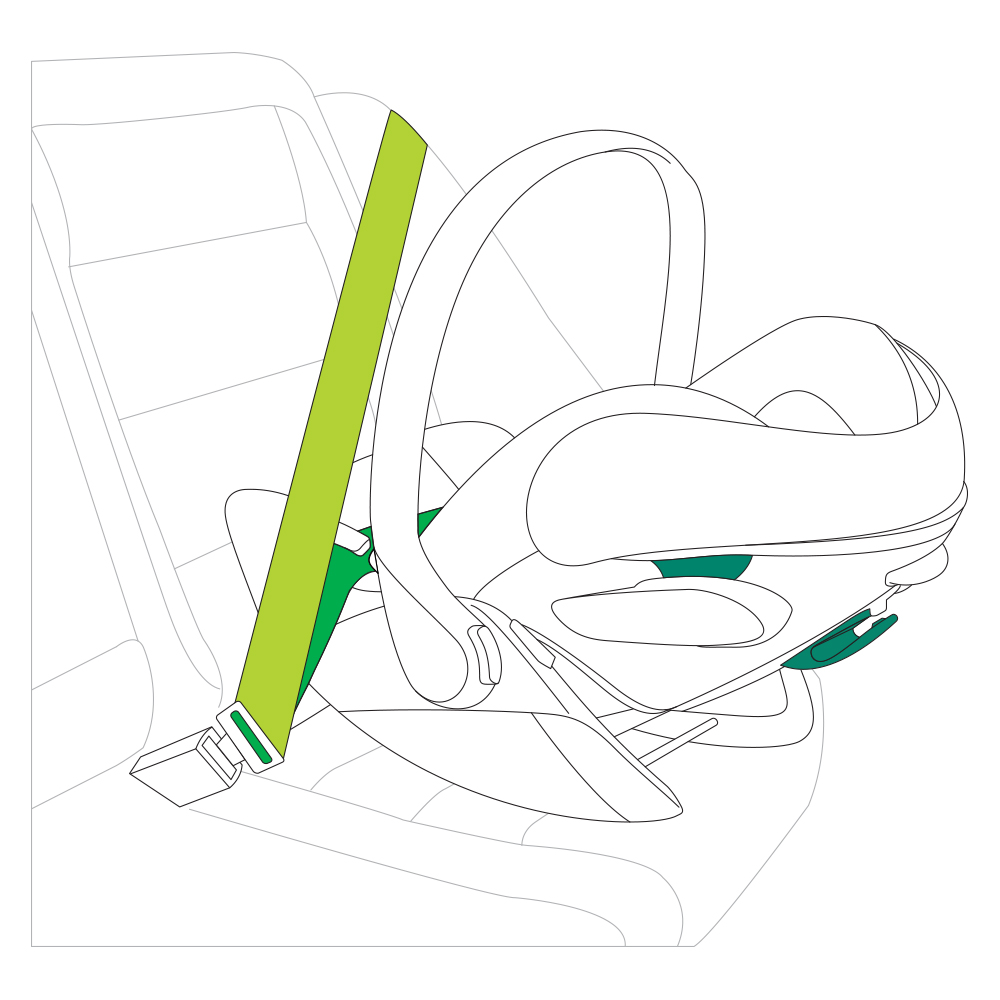
This method secures the car seat using your vehicle's seat belt system. Most car seats have designated belt paths to route the seat belt through. European belt routing adds an extra step by guiding the shoulder belt across the back of the carrier for added stability.
Rear-Facing Car Seat Installation
Rear-facing seats are recommended for newborns and small children due to better head, neck, and spine protection in a crash.
Installation with Base:
• Use either lower anchors or a vehicle
lap and shoulder belt, never both
• Ensure the base is flat and stable
• Use the level indicator to check the
recline angle
• Listen for the "click" when snapping the
carrier into place
Installation without Base: (e.g. in taxis or rideshares)
• Route the vehicle seat belt through the
guides on the carrier
• Buckle the belt and pull to tighten, and
lock the vehicle belt
• Ensure the seat is secure with minimal
movement by checking at the belt path
for movement of no more than 1”.
Forward-Facing Car Seat Installation:
Used once your child exceeds rear-facing limits (check your car seat manual).
• Position the seat upright against
the vehicle seat and find the
forward-facing belt path
• Use lower anchors or a seat belt,
never both
• Always attach the top tether anchor
to reduce head movement
• Pull the belt or LATCH strap tightly for
a snug fit and check the base at the belt
path for movement of no more than 1”.

Booster Seat Setup:
For older children who meet booster size/weight requirements.
• Place booster flat on the vehicle seat
• If your booster has LATCH, it’s a good
idea to use it to attach the seat to the
vehicle.
• Route the lap belt low across child’s
hips, not stomach
• Shoulder belt should lie snugly across
the child’s chest
Rear-Facing Car Seat Installation
Rear-facing seats are recommended for newborns and small children due to better head, neck, and spine protection in a crash.
Installation with Base:
• Use either lower anchors or a vehicle lap and shoulder belt, never both
• Ensure the base is flat and stable
• Use the level indicator to check the recline angle
• Listen for the "click" when snapping the carrier into place
Installation without Base: (e.g. in taxis or rideshares)
• Route the vehicle seat belt through the guides on the carrier
• Buckle the belt and pull to tighten, and lock the vehicle belt
• Ensure the seat is secure with minimal movement by checking at the belt
path for movement of no more than 1”.
Forward-Facing Car Seat Installation:
Used once your child exceeds rear-facing limits (check your car seat manual).
• Position the seat upright against the vehicle seat and find the forward-facing
belt path
• Use lower anchors or a seat belt, never both
• Always attach the top tether anchor to reduce head movement
• Pull the belt or LATCH strap tightly for a snug fit and check the base at the
belt path for movement of no more than 1”.

Booster Seat Setup:
For older children who meet booster size/weight requirements.
• Place booster flat on the vehicle seat
• If your booster has LATCH, it’s a good idea to use it to attach the seat to the
vehicle.
• Route the lap belt low across child’s hips, not stomach
• Shoulder belt should lie snugly across the child’s chest
Rear-Facing Car Seat Installation
Rear-facing seats are recommended for newborns and small children due to better head, neck, and spine protection in a crash.
Installation with Base:
• Use either lower anchors or a vehicle lap and shoulder belt, never both
• Ensure the base is flat and stable
• Use the level indicator to check the recline angle
• Listen for the "click" when snapping the carrier into place
Installation without Base: (e.g. in taxis or rideshares)
• Route the vehicle seat belt through the guides on the carrier
• Buckle the belt and pull to tighten, and lock the vehicle belt
• Ensure the seat is secure with minimal movement by checking at the belt path
for movement of no more than 1”.
Forward-Facing Car Seat Installation:
Used once your child exceeds rear-facing limits (check your car seat manual).
• Position the seat upright against the vehicle seat and find the forward-facing belt
path
• Use lower anchors or a seat belt, never both
• Always attach the top tether anchor to reduce head movement
• Pull the belt or LATCH strap tightly for a snug fit and check the base at the belt path
for movement of no more than 1”.
Booster Seat Setup:
For older children who meet booster size/weight requirements.
• Place booster flat on the vehicle seat
• If your booster has LATCH, it’s a good idea to use it to attach the seat to the
vehicle.
• Route the lap belt low across child’s hips, not stomach
• Shoulder belt should lie snugly across the child’s chest
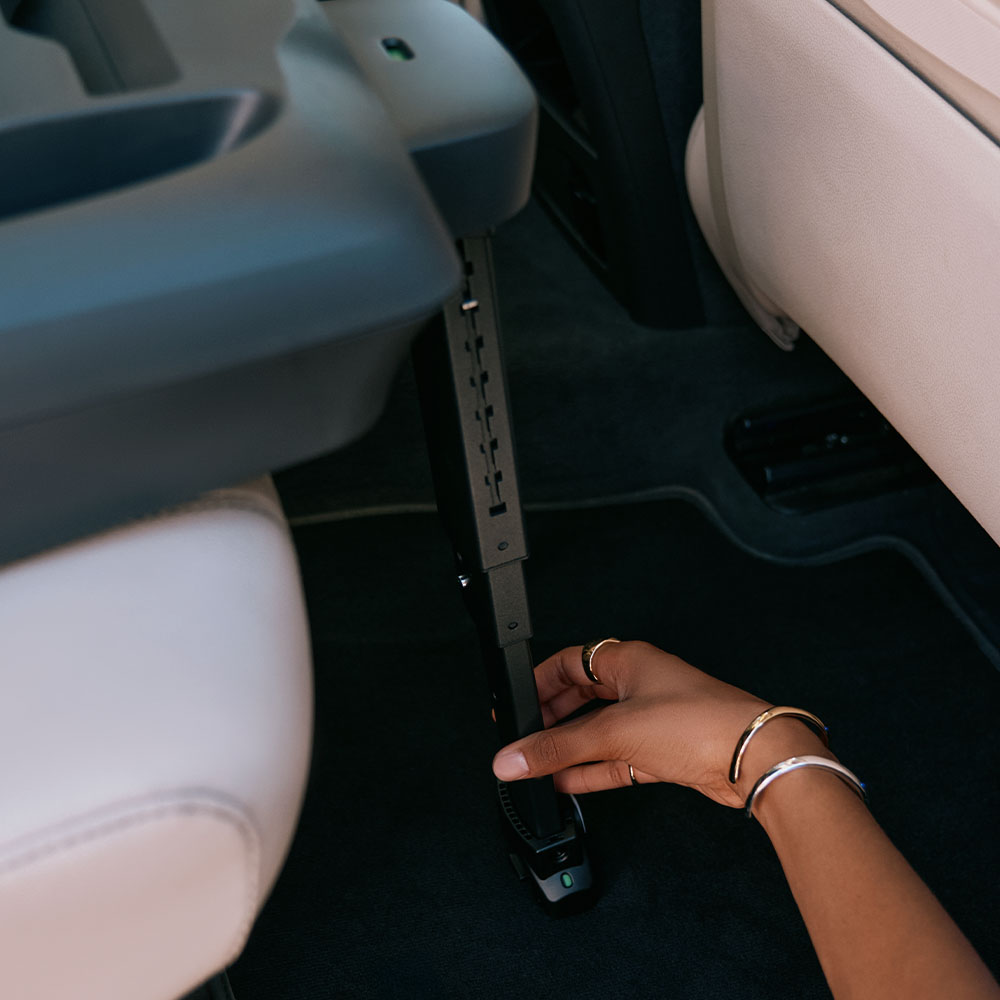
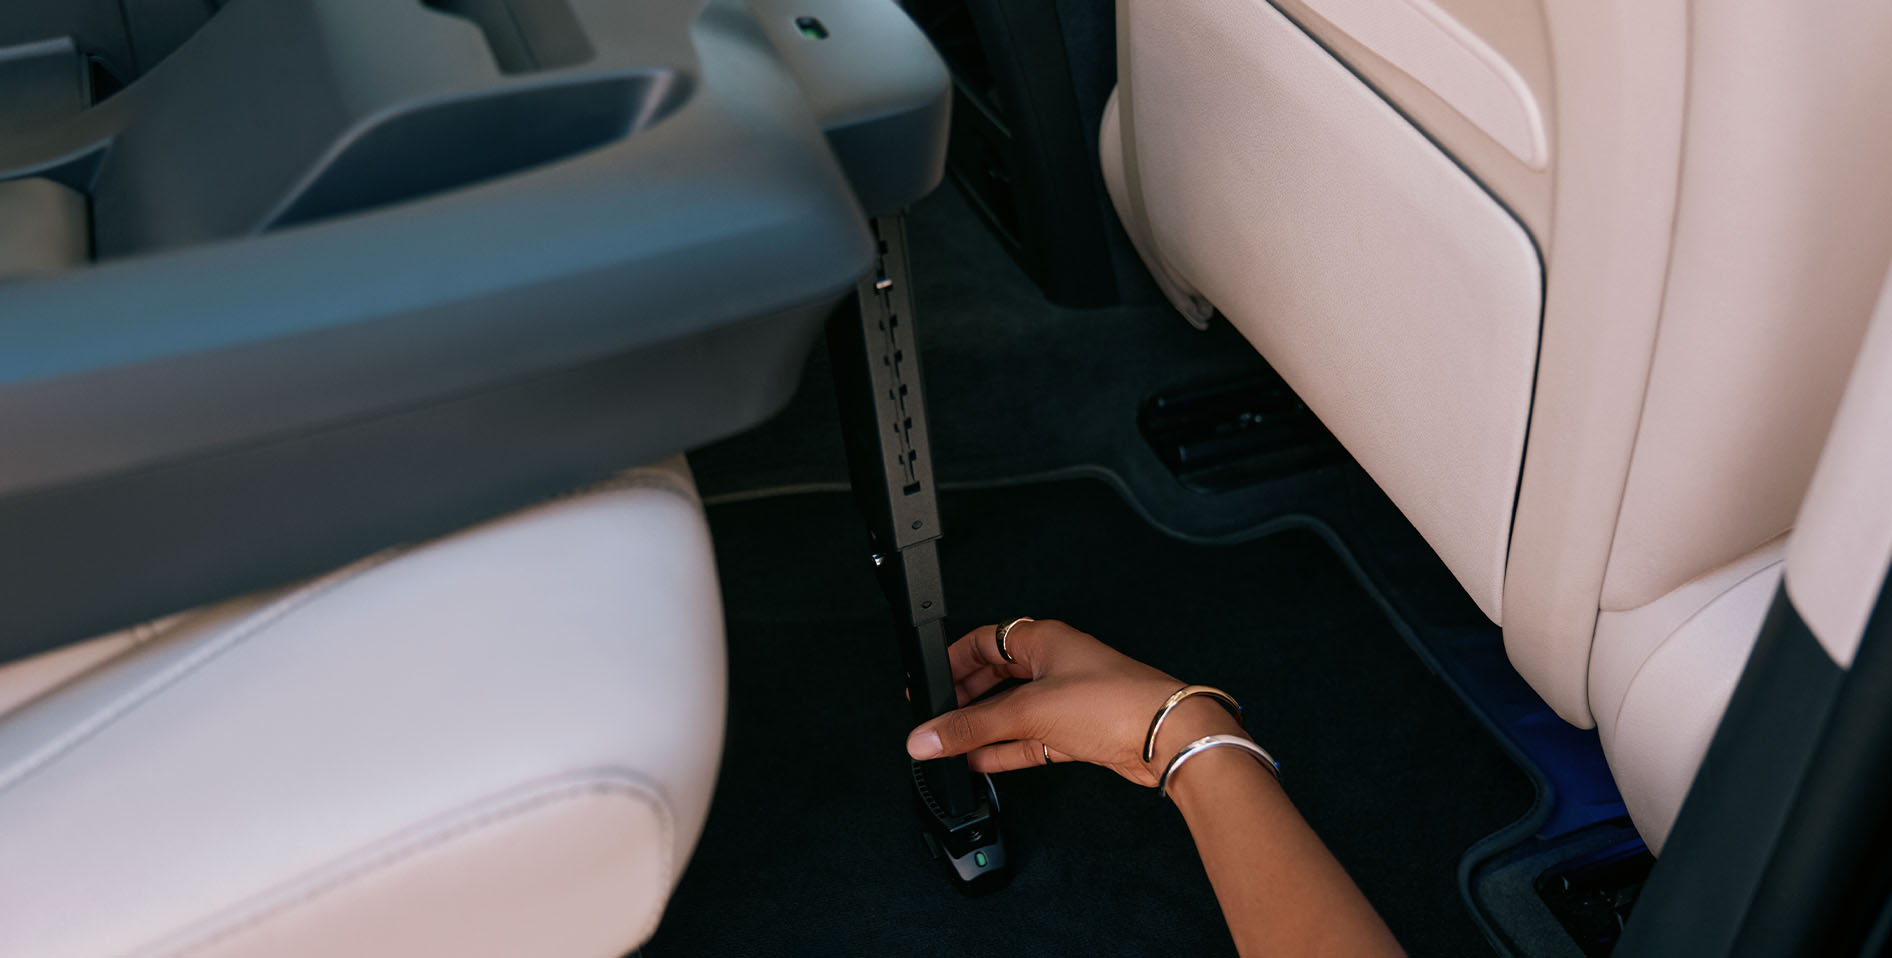
Using a Car Seat Base: Do You Need It?
Many infant car seats come with a detachable base that stays installed in your vehicle, allowing you to simply click the car seat in and out as needed. This can be a huge convenience for busy families, especially when dealing with multiple drop-offs or frequent outings. However, a base isn't required in every situation, and some parents may prefer the flexibility of installing the seat without one, particularly when traveling or using taxis a lot.
A car seat base can make installation faster and easier, but it’s not always necessary.
When to use a base:
![]() For daily use in your main vehicle
For daily use in your main vehicle
![]() When using infant car seats that can
When using infant car seats that can
click into the base

When not to use a base:
![]() In taxis or travel situations
In taxis or travel situations
![]() When using European belt routing
When using European belt routing
on approved car seats (a method
where the vehicle belt routes across
the front of the infant seat for added
stability)
Always refer to the car seat manual to check if your model supports installation with and/or without a base.
Using a Car Seat Base: Do You Need It?
Many infant car seats come with a detachable base that stays installed in your vehicle, allowing you to simply click the car seat in and out as needed. This can be a huge convenience for busy families, especially when dealing with multiple drop-offs or frequent outings. However, a base isn't required in every situation, and some parents may prefer the flexibility of installing the seat without one, particularly when traveling or using taxis a lot.
A car seat base can make installation faster and easier, but it’s not always necessary.
When to use a base:
![]() For daily use in your main vehicle
For daily use in your main vehicle
![]() When using infant car seats that can click into the base
When using infant car seats that can click into the base

When not to use a base:
![]() In taxis or travel situations
In taxis or travel situations
![]() When using European belt routing on approved car seats (a method
When using European belt routing on approved car seats (a method
where the vehicle belt routes across the front of the infant seat for
added stability)
Always refer to the car seat manual to check if your model supports installation with and/or without a base.
Using a Car Seat Base: Do You Need It?
Many infant car seats come with a detachable base that stays installed in your vehicle, allowing you to simply click the car seat in and out as needed. This can be a huge convenience for busy families, especially when dealing with multiple drop-offs or frequent outings. However, a base isn't required in every situation, and some parents may prefer the flexibility of installing the seat without one, particularly when traveling or using taxis a lot.
A car seat base can make installation faster and easier, but it’s not always necessary.
When to use a base:
![]() For daily use in your main vehicle
For daily use in your main vehicle
![]() When using infant car seats that can click into the base
When using infant car seats that can click into the base
When not to use a base:
![]() In taxis or travel situations
In taxis or travel situations
![]() When using European belt routing on approved car seats (a method
When using European belt routing on approved car seats (a method
where the vehicle belt routes across the front of the infant seat for added
stability)
Always refer to the car seat manual to check if your model supports installation with and/or without a base.
Common Car Seat Installation Mistakes
Even when following instructions, it's easy to make small errors that reduce the effectiveness and safety of a car seat. That's why it's important to be aware of the most common mistakes parents and caregivers make during installation. From improper angles to loose harnesses, these missteps can have serious consequences. The good news? Most are easily fixed once you know what to look for.
Avoid these issues to keep your child safer:
![]() Using both LATCH and seat belt at
Using both LATCH and seat belt at
the same time
![]() Incorrect recline angle (especially
Incorrect recline angle (especially
for newborns)
![]() Failing to attach or tighten the top
Failing to attach or tighten the top
tether anchor
![]() Loose installation: Move the car seat
Loose installation: Move the car seat
from side to side - it should move
less than an inch.
When in doubt, book a check with a professional.

Common Car Seat Installation Mistakes
Even when following instructions, it's easy to make small errors that reduce the effectiveness and safety of a car seat. That's why it's important to be aware of the most common mistakes parents and caregivers make during installation. From improper angles to loose harnesses, these missteps can have serious consequences. The good news? Most are easily fixed once you know what to look for.
Avoid these issues to keep your child safer:
![]() Using both LATCH and seat belt at the same time
Using both LATCH and seat belt at the same time
![]() Incorrect recline angle (especially for newborns)
Incorrect recline angle (especially for newborns)
![]() Failing to attach or tighten the top tether anchor
Failing to attach or tighten the top tether anchor
![]() Loose installation: Move the car seat from side to
Loose installation: Move the car seat from side to
side - it should move less than an inch.
When in doubt, book a check with a professional.

Common Car Seat Installation Mistakes
Even when following instructions, it's easy to make small errors that reduce the effectiveness and safety of a car seat. That's why it's important to be aware of the most common mistakes parents and caregivers make during installation. From improper angles to loose harnesses, these missteps can have serious consequences. The good news? Most are easily fixed once you know what to look for.
Avoid these issues to keep your child safer:
![]() Using both LATCH and seat belt at the same time
Using both LATCH and seat belt at the same time
![]() Incorrect recline angle (especially for newborns)
Incorrect recline angle (especially for newborns)
![]() Failing to attach or tighten the top tether anchor
Failing to attach or tighten the top tether anchor
![]() Loose installation: Move the car seat from side to side - it should move less than
Loose installation: Move the car seat from side to side - it should move less than
an inch.
When in doubt, book a check with a professional.
FAQs on Car Seat Installation
Still have questions about car seat installation? You're not alone. These are some of the most common concerns parents and caregivers have when trying to ensure their car seat is installed safely and correctly.
Virtual Help from CYBEX CPSTs
Schedule a free one-on-one session with a certified Child Passenger Safety Technician (CPST) to guide you through the installation process.
Other Local Support Options
- Fire departments: Some offer car seat checks, but availability varies. Call to ask if they have a CPST on staff.
- Inspection stations: Find a certified technician through NHTSA’s locator tool
Professional help can make the difference between a secure installation and a dangerous one.
You don’t have to, but it’s highly recommended, especially for first-time users or new car seat setups. Even small errors can affect safety, and a professional can help you avoid common mistakes and feel confident that everything is secure.
Many do, but it's not guaranteed. Always call ahead to ask about CPST availability or use the NHTSA search tool to locate alternative options in your area.
Car seat inspection stations – often found at hospitals, fire departments, or community centers – offer hands-on help. You can also check the NHTSA’s technician locator to find a certified expert near you.
When installing your car seat, the safest position in the car is ultimately one that you can achieve a proper and tight installation every time. If a proper installation is not possible in the center seat, the next best position is in the back seat behind the front passenger seat.
Please keep the following in mind when deciding where to install your car seat:
1. Never place a child in front of an active airbag. If there is no alternative, you must disable the airbag before installing the car seat.
2. Always check your car seat and vehicle user manual for guidance on the best place to install the seat, as well as any possible restrictions.
3. The use of lower anchors (LATCH) for the center seating position may not be approved by your vehicle manufacturer.
3. The use of lower anchors for the center seating position may not be approved by your vehicle manufacturer.
CYBEX allows specific car seats to be installed using the two inner Lower Anchors from the outboard seating positions if the distance between them is between 28-51 cm (11-20 in) AND if the vehicle manufacturer allows it. (If distance is not correct and/or not allowed by vehicle manufacturer, the vehicle belt must be used for installation in the center position.)

Flexible LATCH is a system for attaching a car seat to the lower anchor bars in a vehicle. The anchor bars are positioned between the vehicle seat cushion and backrest. The car seat is attached to these bars with either hook-style or push-on lower anchor connectors, connected to the seat by straps.
When installing the car seat, each lower anchor connector must be attached to a lower anchor bar in the vehicle. Then the straps must be tightened until the car seat is secure.
Center Seat Installation: For CYBEX car seats with Flexible LATCH, it may be possible to use the center seating position if the following criteria are met:
1) This is permitted by the vehicle manufacturer.
2) The lower anchor bars are spaced 11 – 20 inches apart.
Rigid LATCH is a system for attaching a car seat to the lower anchor bars in a vehicle. This system uses rigid connectors on the car seat, designed to directly couple the car seat to the vehicle.
For car seat installation, the lower anchor connector system is attached to the lower anchor bars in the vehicle. Often the car seat is then pushed closer to the vehicle seat backrest to secure the installation. No tightening is necessary.
Center Seat Installation: On car seats with Rigid LATCH it may not be possible to install in the center seating position. You must use a seating position in the vehicle where the lower anchor bars are spaced 11 inches apart.
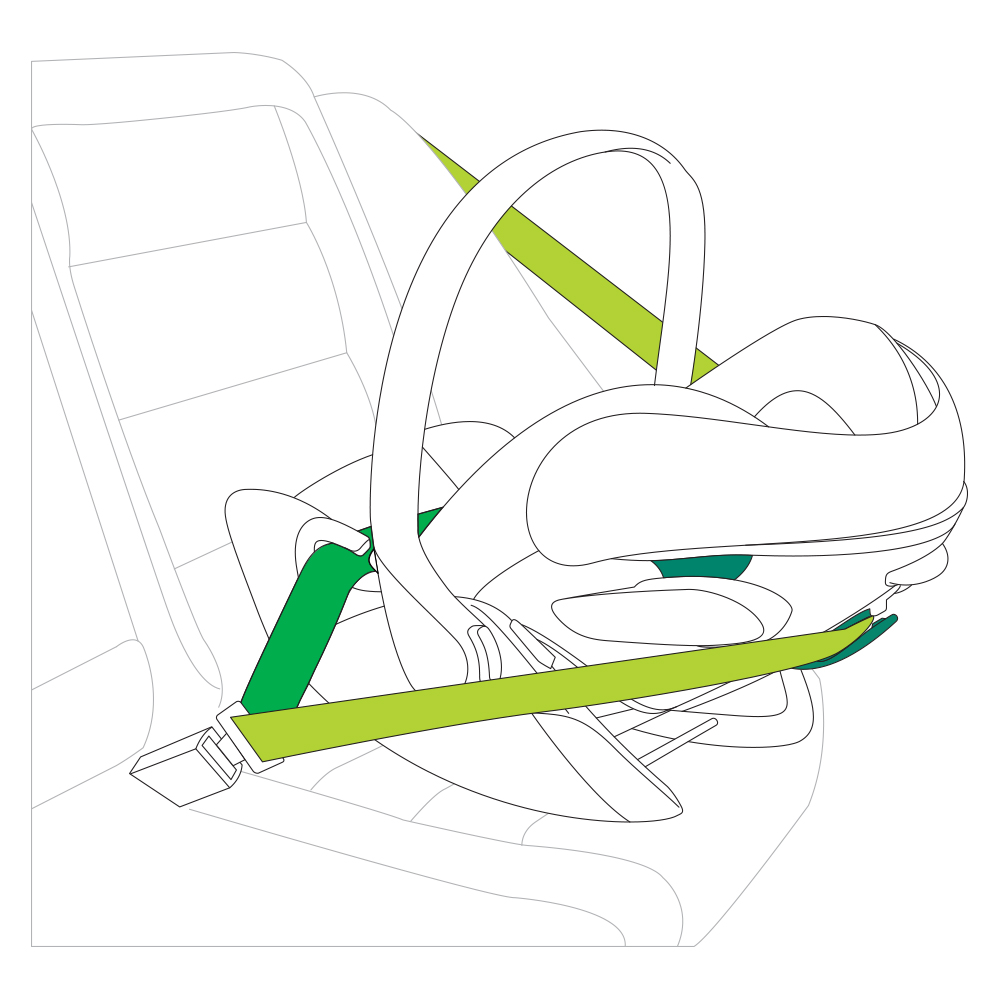
The European belt path is generally the preferred installation method for an infant car seat without a base. This method requires a seat belt system with both a lap and shoulder belt.
The lap belt is placed across the infant car seat, running through belt guides on top of the seat. The shoulder belt is run through a belt guide at the back of the seat.
The key benefit of the European belt path is that the shoulder belt provides additional stability and helps to limit rotation in a frontal crash.
Note: In some vehicles, the lap/shoulder belt system may not be long enough to stretch around the infant car seat. If this is the case, you can use the standard belt path installation method.
The standard belt path method is for the lap belt to be stretched across the infant car seat and placed in belt guides on top of it.
The shoulder belt is left to lie across the vehicle seat backrest. Only the lap belt is secured in the belt guides on the car seat.
There are many thousands of combinations of vehicle makes, models, car seat configurations, vehicle seat belt designs, and seat cushion shapes. The easiest way to determine whether a particular car seat setup is suitable for your vehicle is to test it out first and check to make sure all car seats can be installed properly, especially when trying to fit multiple car seats on the back bench of your vehicle.
The following conditions should be met when installing three car seats next to each other:
- Each car seat must be installed firmly and correctly.
- Each car seat must be positioned properly on an individual vehicle seat and must align properly with the seat belt or lower anchors that secure them. None of the car seats should encroach onto another vehicle seat, and the position of each car seat must not be affected by contact with another seat.
- If the individual seats on the back bench can be adjusted forwards and back, make sure that all vehicle seats are adjusted to the same position.
- Only one lower anchor connector must be connected to any single lower anchor point.
- None of the car seats can come into contact with any surface in a way that could bend or deform any of their components.
- None of the lower anchor belts or seat belts used to install each car seat should rub on each other or crossover in such a way that they interfere with each other.
In addition to this, some car seats are designed to rotate to allow easy onboarding and offboarding. These car seats need additional lateral space for the rotation, which may mean that so fitting another car seat in the adjacent seating position isn’t possible without restricting the use of this feature.
Some car seat harnesses are adjusted by pulling a strap at the front of the car seat (between the child’s legs). These generally adjust more smoothly when pulled in a downward motion. However, if the car seat is installed in a rear-facing position, it can be harder to pull downward on the strap. In this case, try the following:
1. Place your child in the seat and buckle the harness.
2. Pull the chest clip out towards you. This will tighten the harness across the child’s legs and gather all of the slack at the child’s shoulders.
3. Next, pull the strap between the child’s legs to remove the slack. Make sure the chest clip does not slide up into the child’s face.
4. Position the chest clip at armpit level and check the harness for tightness by pinching at the child’s shoulders.
There are many thousands of combinations of vehicle makes, models, car seat configurations, vehicle seat belt designs, and seat cushion shapes. Therefore it’s not easy to say for certain whether a third passenger will fit on the back bench of your vehicle. For example, some smaller sedans and SUVs have rear seat belt systems that overlap, which makes it very difficult to fit a third passenger in the rear seat.
In addition to this, some car seats rotate to allow your child to be easily onboarded and offboarded, for example, the CYBEX Sirona S. This car seat will need some additional lateral space for the rotation, so fitting a passenger in the adjacent seating position may make using that feature difficult.
The easiest way to determine whether a particular car seat setup is possible is to test it out beforehand and ensure that the car seats can maintain a proper, tight installation, especially when trying to fit multiple passengers in the back seat of your vehicle.
CYBEX car seats come with positioning inserts, which should be used per the instructions in your car seat user guide. Using the insert that came with your car seat may help eliminate the gap between your child and the buckle.
If the positioning insert does not eliminate the gap, you may use some fabric such as a small washcloth to help fill in this gap. Simply place your child in the car seat and buckle and tighten the harness until it is tight enough so you cannot pinch the straps together at the child’s shoulders. Once tightened, slide the cloth in the gap between your child and the crotch buckle.
If needed, you may also use tightly rolled receiving blankets placed next to your child to center him or her in the car seat. The positioning blankets should never be placed under the child, between the child and the harness, or near the child’s mouth, face or neck.
Belt-positioning booster seats are designed to raise the child up and help to position the vehicle lap and shoulder belt correctly. When a child is properly positioned in a belt-positioning booster seat, the vehicle’s seat belt system can correctly secure them, reducing their risk of injury in all types of crashes. In the event of a crash, the vehicle seat belt system provides all of the crash protection for a child in a belt-positioning booster seat. Because a seat belt extender modifies the existing vehicle seat belt system, it should be specifically approved for use by the vehicle manufacturer before use with a booster seat.